- Documentation
- FreeSewing Designs
- Waralee wrap pants
- Waralee wrap pants: Sewing Instructions
Waralee wrap pants: Sewing Instructions
The key to Waralee is the waist band
In a way, Waralee is just a waist band with a long piece of fabric attached. The waist band needs to continue from the fabric into two straps of fabric that are used to tie the pants in the front and two in the back. These straps are pieces 7 and 8 in the pattern. Traditionally, they are of similar length. I made longer ones for the front panel (the side that is a little shorter than the other, on the left in the illustrations below), to allow you to tie both sets in the front. I prefer this as it is easier to tie, and you don’t have the bulk of the knot in the back.
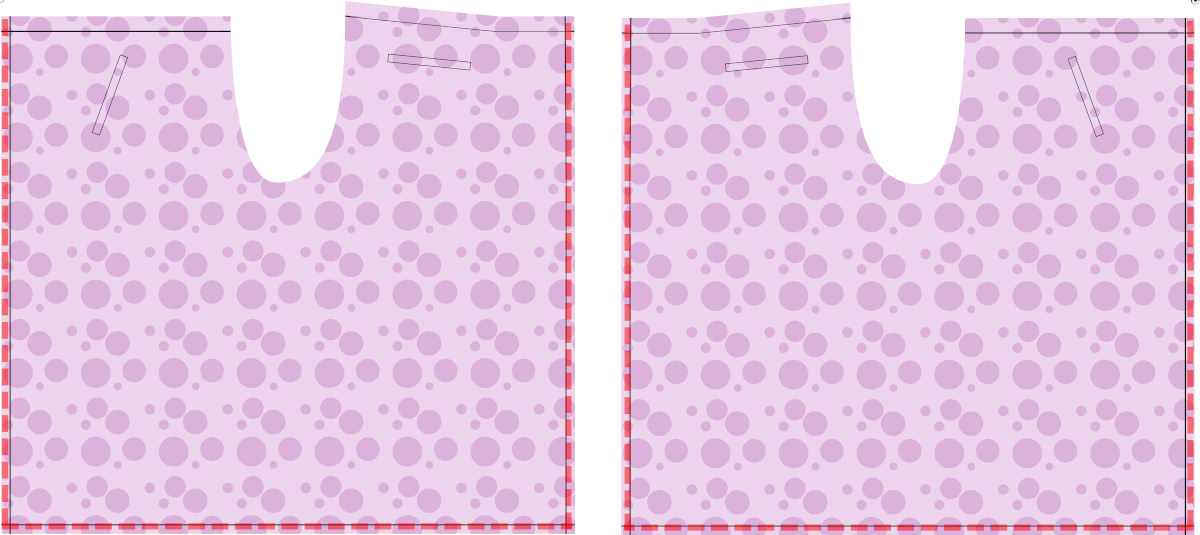
Step 1: Sew the pockets
Pockets are optional
Traditionally, these types of pants do not have pockets. But I want to put my phone, keys and wallet somewhere. So I’ve included pockets in the pattern. You can decide for yourself if you would like them on your pants.
The illustrations in the next steps show the Waralee pants without pockets. Only the pocket placements from the pattern are shown, to help you orient yourself.
If you do want pockets, make them first
If you’re going to make the pockets, make them before putting one piece of fabric on the other. It’s easier to work with the parts still separated.
Both sets of pockets on Waralee are single welt pockets. These use a single piece of fabric to create a pocket opening, but are otherwise very similar to the double welt pockets shown here: Double welt pockets.
We’ll start with the front pockets.
- Start with all the parts, and mark the location of the pocket on the right side of the fabric.
- Mark the pocket opening on one of the facing pieces too. This time on the wrong side of the fabric.
- Place the facing on the fabric, right sides together. Align the corners of the pocket openings, and pin in place.
Pocket lining
- Mark the pocket opening on your pocket lining. It should be just inside the seam allowance.
- Align the pocket openings up on all fabric pieces, and line your pocket lining top up with the waistband. Pin or baste in place.
Pocket opening
- Using small stitches, sew the long sides of the pocket openings, catching fabric, facing, and pocket lining. Do not sew past the ends of the pocket opening.
- Cut a slit directly between the two lines of stitching. Just before the end, split each end of the cut, snipping into each corner of the pocket opening (but not past). You should have a small V at each end of the cut.
- Press the seams open.
- Now push everything through the opening to the other side. Lay everything out nicely with the pocket opening open. Press the pocket opening.
Constructing the welt
- Turn the garment over, and press the bottom edge of the pocket facing under. Later, this will yield a nice, clean edgestitch.
- Next, flip the pocket facing up, so that it covers the pocket opening. Then, fold back just enough of the facing to exactly cover the entire pocket opening. Press, and pin in place.
Sewing the pocket opening in place
- Turn the whole thing right side up, then fold back the fabric on one short side of the pocket opening, revealing a little triangle cutout and your pocket lining.
- Sew the short edge of the pocket opening, just outside of your markings. This should secure the V-shaped cutout bits to the lining. Once you feel confident everything will look good from the right side, restitch this line a few times to secure.
- Press.
- To make things nice and tidy, you’ll also stitch the bottom edge of the pocket facing to the pocket lining at this point. (This is why we pressed the very edge under earlier.)
Finishing the pocket
- Take your second pocket facing, and press all edges under except for one of the longer edges.
- Lay this facing over the pocket opening, right sides together and raw edge aligned with the raw edge of the pocket lining.
- Now, fold your pocket lining over, aligning all the edges of the pocket.
- Pin or clip the second pocket facing to the pocket lining along the raw edges. Then flip the pocket lining back, and pin the entire edge of the facing to the pocket lining.
- Edgestitch the facing to the pocket fabric. This will sit behind the pocket opening when everything is assembled, so that if your pocket gaps open, your fashion fabric will show in the gap.
- Flip the pocket fabric back, aligning edges, and pin all sides of the pocket. Close the pocket as you normally do. You can use a french seam, a serger, or another method.
Making everything clean and tidy
- Flip the whole piece over so you’re looking at the right side.
- Fold back the main fabric, so you can see the little triangles on the short edge of the pocket opening.
- Sew another line, now through all layers. You should be able to see the edge stitching line of the first facing. Stitch all the way to this line, which finishes the facing on the inside of the pocket. You want to be really close to the fold with this stitch line.
- Now fold the fabric back on the long side of the pocket opening, where the pocket sides were stitches together. You’ll see the initial stitch line of the pocket opening. Make sure all the layers of fabric are laying nicely, and stitch over this stitch line once again, now through all layers. This secures this side of the pocket to the garment fabric.
- Flip over, press well, and admire your work.
I included placements for the front pockets that will be hidden by the flaps in the front. But they will still be easily accessible to put your phone or keys in. These are single welt pockets. The ones in the front are at an angle and the ones in the back are horizontally oriented. The pocket templates should allow for enough fabric to attach the pocket to the waistband. If you want particularly deep pockets, please adjust accordingly.
Constructing the back pockets
- The back pockets are also single welt pockets, but the pocket opening is horizontal, rather than at an angle. This means they hew much closer to the instructions for double welt pockets.
- Follow the double welt instructions, modifying the opening to have a single welt, rather than a double welt.
Congratulations! Your pockets are finished!
Step 2: Hem the sides and bottom
- Hem the sides
- Hem the bottom.
You can use whatever method works best for you. In the version I first made I just serged the sides, folded them back and top stitched them, then did the same for the bottom. I did this to keep the bulk of the fabric to a minimum and allow for a better drape. What you do should depend on the type of fabric you’re using.
Step 3: Sew the two pants parts together at the crotch

Now you get to sew the two pants parts together.
- Lay the two pants parts on top of one another with and sew the seam along the cutout.
- Finish this seam and press it.
Step 4: Prepare the four straps
The straps are just long tubes of fabric.
If you printed them, just cut them out. If not, the Messages from the designer will have a note about their sizes.
Traditionally, the straps are the same size
The straps in this design have a longer and a shorter pair. Traditionally the straps are tied both in the front and in the back. I find the more aesthetically pleasing to tie both in the front. And it removes the knot in the back, which can be uncomfortable.
If your material is delicate or flimsy, you can add some interfacing to this to give it strength.
- Fold them in half along the long side, .
- Stitch the long side and one of the short sides,
- Turn the tie right side out.
Turning tubes of fabric right side out can be difficult
This can be made easier by taking a piece of twine longer than the strips. Lay that between the right sides, along the fold. Make sure you catch this while sewing the short side. You can use this to pull the end through the tube you’ve created. When you’re done, you can cut it off. Having a long, skinny stick or a loop turner can help too with this.
Step 5: Sew the waist band

Now it is time to sew the waist band.
- If your fabric is delicate, add interfacing to the wrong side of the pants above the waist band line. (red)
- Fold the seam allowance in, and then fold along the waist band line. (red)
- Insert one of the straps you made in the previous step on each side.
- Sew along the waist band line, and add some additional stitching to make sure those straps are attached well. (blue)
Secure the straps well
The straps keep your pants up, so having that stitching fail will result in awkward moments.
Step 6: Wear your pants
Press your pants, and try them on!
Hold the front side against your belly and wrap both straps around you and tie in the back (or, if you have long straps, wrap them all the way around you and tie in the front). Then hand the back side through your legs to yourself and tie the other straps in the front.
Here is an article demonstrating how to tie wrap pants: How to Tie Wrap Pants
If you get stuck, or have additional questions, you can always reach out to other FreeSewers.