About FreeSewing
- Getting started with FreeSewing.org
- FreeSewing Community Standards
- FreeSewing Privacy Notice
Frequently Asked Questions
- Can I use FreeSewing patterns for commercial purposes?
- How can I sign up? I never received the E-mail to activate my account!
- I'm having trouble with measurements. What should I check?
- Where did the "standard" measurements go?
- Why are seam allowances not included by default?
- Why are seam allowances tapered?
- Why do you even publish womenswear blocks? They are [insert strong opinion here].
- Why don't you use double notches to mark the back of the pattern?
- Pattern Notation Guide
- Terminology
- Your rights as a FreeSewing user
FreeSewing Designs
Bee bikini top
- Bee bikini top: Cutting Instructions
Bee bikini top: Design Options
- Armhole depth (Bella)
- Back dart height (Bella)
- Band (chest) tie length
- Band (chest) tie width
- Band Length (Cross back ties)
- Bottom depth
- Bust span ease
- Chest ease
- Cross back ties
- Duo color ties
- Front armhole pitch depth (Bella)
- Front curve
- Front shoulder width (Bella)
- Full chest reduction (Bella)
- High bust width (Bella)
- Neck tie colours
- Neck tie length
- Neck tie width
- Pointed tie ends
- Reversible
- Shoulder to Shoulder ease (Bella)
- Show Bella
- Side curve
- Side depth
- Ties
- Top Depth
- Waist ease
- Bee bikini top: Designer Notes
- Bee bikini top: Fabric Options
- Bee bikini top: Required Measurements
- Bee bikini top: Sewing Instructions
- Bee bikini top: What You Need
Bella body block
- Bella body block: Cutting Instructions
Bella body block: Design Options
- Armhole depth
- Back armhole curvature
- Back armhole pitch depth
- Back armhole slant
- Back dart height
- Back hem slope
- Back neck cutout
- Bust dart curve
- Bust dart length
- Bust span ease
- Chest ease
- Front armhole curvature
- Front armhole pitch depth
- Front shoulder width
- Full chest ease reduction
- High bust width
- Shoulder to Shoulder ease
- Waist dart length
- Waist ease
- Bella body block: Designer Notes
- Bella body block: Fabric Options
- Bella body block: Required Measurements
- Bella body block: Sewing Instructions
- Bella body block: What You Need
Bent body Block
- Bent body Block: Cutting Instructions
Bent body Block: Design Options
- Across back factor
- Armhole depth
- Armhole depth factor
- Back neck cutout
- Biceps ease
- Chest ease
- Collar ease
- Cuff ease
- Draft for high bust
- Front armhole extra cutout
- Legacy armhole depth
- Length bonus
- Shoulder ease
- Shoulder seam shift: armhole side
- Shoulder seam shift: collar side
- Shoulder slope reduction
- Sleeve bend
- Sleeve length bonus
- Sleevecap ease
- Sleevecap height
- Bent body Block: Designer Notes
- Bent body Block: Fabric Options
- Bent body Block: Required Measurements
- Bent body Block: Sewing Instructions
- Bent body Block: What You Need
Bibi body block
- Bibi body block: Cutting Instructions
Bibi body block: Design Options
- Across back factor
- Armhole curve back
- Armhole curve front
- Armhole depth
- Armhole drop back
- Back Neckline curvature
- Back Neckline depth
- Biceps ease
- Bust adjustment
- Bust ease
- Chest ease
- Curvature adjustment
- Dart
- Fit the waist
- Flare
- Front Neckline curvature
- Front Neckline depth
- Hips ease
- Knit binding height
- Length
- Length adjustment
- Length bonus
- Neckline width
- Ribbing height
- Ribbing stretch
- Seat back adjustment
- Seat ease
- Shoulder ease
- Shoulder slope reduction
- Sleeve ease
- Sleeve fullness
- Sleeve length
- Sleevecap Q1 downward spread
- Sleevecap Q1 offset
- Sleevecap Q1 upward spread
- Sleevecap Q2 downward spread
- Sleevecap Q2 offset
- Sleevecap Q2 upward spread
- Sleevecap Q3 downward spread
- Sleevecap Q3 offset
- Sleevecap Q3 upward spread
- Sleevecap Q4 downward spread
- Sleevecap Q4 offset
- Sleevecap Q4 upward spread
- Sleevecap back X
- Sleevecap back Y
- Sleevecap ease
- Sleevecap front X
- Sleevecap front Y
- Sleevecap top X
- Sleevecap top Y
- Sleeves
- Strap width
- Use cuff ribbing
- Use waistband ribbing
- Waist adjustment
- Waist ease
- Bibi body block: Designer Notes
- Bibi body block: Fabric Options
- Bibi body block: Required Measurements
- Bibi body block: Sewing Instructions
- Bibi body block: What You Need
Breanna body block
- Breanna body block: Cutting Instructions
Breanna body block: Design Options
- Across back factor
- Armhole depth factor
- Back neck cutout
- Biceps ease
- Bust dart
- Bust dart length
- Bust darts shaping
- Chest ease
- Collar ease
- Cuff ease
- Front armhole extra cutout
- Front scye dart
- Secondary bust dart
- Secondary bust dart length
- Shoulder dart
- Shoulder dart length
- Shoulder dart size
- Shoulder ease
- Shoulder slope reduction
- Sleeve length bonus
- Sleevecap Q1 downward spread
- Sleevecap Q1 offset
- Sleevecap Q1 upward spread
- Sleevecap Q2 downward spread
- Sleevecap Q2 offset
- Sleevecap Q2 upward spread
- Sleevecap Q3 downward spread
- Sleevecap Q3 offset
- Sleevecap Q3 upward spread
- Sleevecap Q4 downward spread
- Sleevecap Q4 offset
- Sleevecap Q4 upward spread
- Sleevecap back X
- Sleevecap back Y
- Sleevecap ease
- Sleevecap front X
- Sleevecap front Y
- Sleevecap top X
- Sleevecap top Y
- Vertical ease
- Waist dart
- Waist dart length
- Waist dart size
- Waist ease
- Breanna body block: Designer Notes
- Breanna body block: Fabric Options
- Breanna body block: Required Measurements
- Breanna body block: Sewing Instructions
- Breanna body block: What You Need
Brian body block
- Brian body block: Cutting Instructions
Brian body block: Design Options
- Across back factor
- Armhole depth
- Armhole depth factor
- Back neck cutout
- Biceps ease
- Chest ease
- Collar ease
- Cuff ease
- Draft for high bust
- Front armhole extra cutout
- Legacy armhole depth
- Length bonus
- Shoulder ease
- Shoulder seam shift: armhole side
- Shoulder seam shift: collar side
- Shoulder slope reduction
- Sleeve length bonus
- Sleeve width guarantee
- Sleevecap Q1 downward spread
- Sleevecap Q1 offset
- Sleevecap Q1 upward spread
- Sleevecap Q2 downward spread
- Sleevecap Q2 offset
- Sleevecap Q2 upward spread
- Sleevecap Q3 downward spread
- Sleevecap Q3 offset
- Sleevecap Q3 upward spread
- Sleevecap Q4 downward spread
- Sleevecap Q4 offset
- Sleevecap Q4 upward spread
- Sleevecap back X
- Sleevecap back Y
- Sleevecap ease
- Sleevecap front X
- Sleevecap front Y
- Sleevecap top X
- Sleevecap top Y
- Brian body block: Designer Notes
- Brian body block: Fabric Options
- Brian body block: Required Measurements
- Brian body block: Sewing Instructions
- Brian body block: What You Need
Carlita coat
- Carlita coat: Cutting Instructions
Carlita coat: Design Options
- Across back factor
- Armhole depth
- Armhole depth factor
- Back neck cutout
- Belt width
- Biceps ease
- Chest ease
- Chest pocket angle
- Chest pocket height
- Chest pocket placement
- Chest pocket width
- Collar flare
- Collar height
- Collar spread
- Contour
- Cuff ease
- Cuff length
- Front armhole extra cutout
- Front overlap
- Horizontal button spacing
- Horizontal pocket placement
- Inner pocket depth
- Inner pocket placement
- Inner pocket welt height
- Inner pocket width
- Lapel reduction
- Legacy armhole depth
- Length
- Pocket flap radius
- Pocket height
- Pocket radius
- Pocket width
- Seat ease
- Shoulder ease
- Shoulder seam shift: armhole side
- Shoulder seam shift: collar side
- Shoulder slope reduction
- Sleeve bend
- Sleeve length bonus
- Sleevecap ease
- Sleevecap height
- Vertical pocket placement
- Waist ease
- Carlita coat: Designer Notes
- Carlita coat: Fabric Options
- Carlita coat: Required Measurements
- Carlita coat: Sewing Instructions
- Carlita coat: What You Need
Carlton coat
- Carlton coat: Cutting Instructions
Carlton coat: Design Options
- Across back factor
- Armhole depth
- Armhole depth factor
- Back neck cutout
- Belt width
- Biceps ease
- Chest ease
- Chest pocket angle
- Chest pocket height
- Chest pocket placement
- Chest pocket width
- Collar flare
- Collar height
- Collar spread
- Cuff ease
- Cuff length
- Draft for high bust
- Front armhole extra cutout
- Front overlap
- Horizontal button spacing
- Horizontal pocket placement
- Inner pocket depth
- Inner pocket placement
- Inner pocket welt height
- Inner pocket width
- Lapel reduction
- Legacy armhole depth
- Length
- Pocket flap radius
- Pocket height
- Pocket radius
- Pocket width
- Seat ease
- Shoulder ease
- Shoulder seam shift: armhole side
- Shoulder seam shift: collar side
- Shoulder slope reduction
- Sleeve bend
- Sleeve length bonus
- Sleevecap ease
- Sleevecap height
- Vertical pocket placement
- Waist ease
- Carlton coat: Designer Notes
- Carlton coat: Fabric Options
- Carlton coat: Required Measurements
- Carlton coat: Sewing Instructions
- Carlton coat: What You Need
Charlie chinos
- Charlie chinos: Cutting Instructions
Charlie chinos: Design Options
- Back pocket depth
- Back pocket facing
- Back pocket horizontal placement
- Back pocket vertical placement
- Back pocket width
- Belt loops
- Cross seam angle
- Cross seam bend
- Crotch drop
- Crotch seam angle
- Crotch seam bend
- Fly curve
- Fly length
- Fly width
- Front pocket depth
- Front pocket facing
- Front pocket slant bend
- Front pocket slant depth
- Front pocket slant round
- Front pocket slant width
- Front pocket width
- Grainline position
- Knee ease
- Leg balance
- Length bonus
- Seat ease
- Start of the cross seam curve
- Start of the crotch seam curve
- Waist balance
- Waist ease
- Waist height
- Waistband Curve
- Waistband width
- Charlie chinos: Designer Notes
- Charlie chinos: Fabric Options
- Charlie chinos: Required Measurements
- Charlie chinos: Sewing Instructions
- Charlie chinos: What You Need
Diana draped top
- Diana draped top: Cutting Instructions
Diana draped top: Design Options
- Across back factor
- Armhole depth
- Armhole depth factor
- Biceps ease
- Chest ease
- Cuff ease
- Draft for high bust
- Drape angle
- Front armhole extra cutout
- Hips ease
- Legacy armhole depth
- Length bonus
- Shoulder ease
- Shoulder seam length
- Sleeve length bonus
- Sleeve width guarantee
- Sleevecap Q1 downward spread
- Sleevecap Q1 offset
- Sleevecap Q1 upward spread
- Sleevecap Q2 downward spread
- Sleevecap Q2 offset
- Sleevecap Q2 upward spread
- Sleevecap Q3 downward spread
- Sleevecap Q3 offset
- Sleevecap Q3 upward spread
- Sleevecap Q4 downward spread
- Sleevecap Q4 offset
- Sleevecap Q4 upward spread
- Sleevecap back X
- Sleevecap back Y
- Sleevecap ease
- Sleevecap front X
- Sleevecap front Y
- Sleevecap top X
- Sleevecap top Y
- Waist ease
- Diana draped top: Designer Notes
- Diana draped top: Fabric Options
- Diana draped top: Required Measurements
- Diana draped top: Sewing Instructions
- Diana draped top: What You Need
Huey hoodie
- Huey hoodie: Cutting Instructions
Huey hoodie: Design Options
- Across back factor
- Armhole depth
- Armhole depth factor
- Back neck cutout
- Biceps ease
- Chest ease
- Collar ease
- Cuff ease
- Draft for high bust
- Front armhole extra cutout
- Hips ease
- Hood angle
- Hood closure
- Hood cutback
- Hood depth
- Hood height
- Legacy armhole depth
- Length bonus
- Pocket height
- Pocket width
- Ribbing
- Ribbing height
- Ribbing stretch
- Shoulder ease
- Shoulder seam shift: armhole side
- Shoulder seam shift: collar side
- Shoulder slope reduction
- Sleeve length bonus
- Sleeve width guarantee
- Sleevecap Q1 downward spread
- Sleevecap Q1 offset
- Sleevecap Q1 upward spread
- Sleevecap Q2 downward spread
- Sleevecap Q2 offset
- Sleevecap Q2 upward spread
- Sleevecap Q3 downward spread
- Sleevecap Q3 offset
- Sleevecap Q3 upward spread
- Sleevecap Q4 downward spread
- Sleevecap Q4 offset
- Sleevecap Q4 upward spread
- Sleevecap back X
- Sleevecap back Y
- Sleevecap ease
- Sleevecap front X
- Sleevecap front Y
- Sleevecap top X
- Sleevecap top Y
- Huey hoodie: Designer Notes
- Huey hoodie: Fabric Options
- Huey hoodie: Required Measurements
- Huey hoodie: Sewing Instructions
- Huey hoodie: What You Need
Jaeger jacket
- Jaeger jacket: Cutting Instructions
Jaeger jacket: Design Options
- Across back factor
- Armhole depth
- Armhole depth factor
- Back neck cutout
- Back vent
- Back vent length
- Biceps ease
- Button length
- Center back dart
- Center front hem drop
- Chest ease
- Chest pocket angle
- Chest pocket depth
- Chest pocket placement
- Chest pocket welt size
- Chest pocket width
- Chest shaping
- Collar ease
- Collar height
- Collar notch angle
- Collar notch depth
- Collar notch return
- Collar roll
- Collar spread
- Cuff ease
- Draft for high bust
- Front armhole extra cutout
- Front cutaway angle
- Front cutaway end
- Front cutaway start
- Front dart placement
- Front overlap
- Front pocket depth
- Front pocket placement
- Front pocket radius
- Front pocket width
- Hem radius
- Hips ease
- Inner pocket depth
- Inner pocket placement
- Inner pocket welt height
- Inner pocket width
- Lapel reduction
- Lapel start
- Legacy armhole depth
- Length bonus
- Number of buttons
- Pocket fold-over
- Roll-line collar height
- Shoulder ease
- Shoulder slope reduction
- Side/Front placement
- Sleeve bend
- Sleeve length bonus
- Sleeve vent length
- Sleeve vent width
- Sleevecap ease
- Sleevecap height
- Waist ease
- Jaeger jacket: Designer Notes
- Jaeger jacket: Fabric Options
- Jaeger jacket: Required Measurements
- Jaeger jacket: Sewing Instructions
- Jaeger jacket: What You Need
Noble body block
- Noble body block: Cutting Instructions
Noble body block: Design Options
- Armhole Dart Position
- Armhole depth
- Back armhole curvature
- Back armhole pitch depth
- Back armhole slant
- Back dart height
- Back hem slope
- Back neck cutout
- Bust span ease
- Chest ease
- Dart position
- Front armhole curvature
- Front armhole pitch depth
- Front shoulder width
- Full chest ease reduction
- High bust width
- Shoulder Dart Curvature
- Shoulder Dart Position
- Shoulder to Shoulder Ease
- Upper Dart Length
- Waist dart length
- Waist dart position
- Waist ease
- Noble body block: Designer Notes
- Noble body block: Fabric Options
- Noble body block: Required Measurements
- Noble body block: Sewing Instructions
- Noble body block: What You Need
Onyx One-piece
- Onyx One-Piece: What You Need
- Onyx One-piece: Cutting Instructions
Onyx One-piece: Design Options
- Armpit ease
- Back on fold
- Center seam ease
- Chest ease
- Crotch gusset width
- Front on fold
- Hips ease
- Hood depth
- Hood height
- Hood hem
- Hoodfrontbonus
- Hoodfrontdip
- Leg hem
- Leg hem ease
- Leg length
- Leg ribbing
- Leg ribbing length
- Leg ribbing width
- Leg taper position
- Neck ease
- Neck position
- Neck style
- Neckband length
- Neckband width
- Outseam ease
- Raglan scoop depth
- Raglan scoop length
- Seat ease
- Skirt
- Skirt hem
- Skirt length
- Skirt waistband
- Skirt width
- Sleeve ease
- Sleeve hem
- Sleeve length
- Sleeve length
- Sleeve ribbing
- Sleeve ribbing length
- Sleeve ribbing width
- Upper leg ease
- Waist ease
- Wrist ease
- Zipper guard width
- Zipper length
- Zipper position
- neck guard length
- Onyx One-piece: Designer Notes
- Onyx One-piece: Fabric Options
- Onyx One-piece: Required Measurements
- Onyx one-piece: Sewing Instructions
Opal Overalls
- Opal Overalls: Cutting Instructions
Opal Overalls: Design Options
- Back bib base angle
- Back bib base curve
- Back bib hexagon height
- Back bib hexagon side height
- Back bib hexagon vertical position
- Back bib hexagon width
- Back pocket
- Back pocket corner height
- Back pocket corner width
- Back pocket height
- Back pocket horizontal position
- Back pocket vertical position
- Back pocket width
- Bib height
- Bib placket layers
- Bib placket width
- Bib pocket
- Bib pocket feature curve
- Bib pocket feature height
- Bib pocket feature width
- Bib pocket height
- Bib pocket on fold
- Bib pocket on fold
- Bib pocket style
- Bib pocket vertical position
- Bib pocket width
- Bib waist drop
- Bib width
- Carpenter pocket
- Carpenter pocket anchor vertical position
- Carpenter pocket anchor width
- Carpenter pocket extra
- Carpenter pocket extra height
- Carpenter pocket height
- Carpenter pocket height
- Carpenter pocket opening height
- Cross seam curve angle
- Cross seam curve bend
- Cross seam curve start
- Crotch drop
- Crotch ease
- Crotch fork balance
- Crotch seam curve angle
- Crotch seam curve bend
- Crotch seam curve start
- Hammer loop
- Hammer loop corner horizontal position
- Hammer loop corner vertical position
- Hammer loop curve
- Hammer loop first fold
- Hammer loop outseam
- Hammer loop second fold
- Hammer loop width
- Hem allowance
- Leg balance
- Leg hem allowance
- Leg hem ease
- Leg length
- Outseam height
- Seat balance
- Seat ease
- Slash pocket
- Slash pocket height
- Slash pocket opening curve
- Slash pocket opening height
- Slash pocket opening width
- Slash pocket shield overlap
- Slash pocket width
- Strap length
- Strap length
- Strap position
- Strap taper curve
- Strap taper position
- Thigh shape
- Waist balance
- Waist ease
- Waist position
- Waistband layers
- Waistband width
- Opal Overalls: Designer Notes
- Opal Overalls: Fabric Options
- Opal Overalls: Required Measurements
- Opal Overalls: Sewing Instructions
- Opal Overalls: What You Need
Paco pants
- Paco pants: Cutting Instructions
Paco pants: Design Options
- Ankle/Hem elastic width
- Back pockets
- Cross seam angle
- Cross seam bend
- Crotch drop
- Crotch seam angle
- Crotch seam bend
- Elasticated cuff
- Front pockets
- Grainline position
- Heel ease
- Leg balance
- Length bonus
- Seat ease
- Start of the cross seam curve
- Start of the crotch seam curve
- Waist balance
- Waist ease
- Waist height
- Waistband width
- Paco pants: Designer Notes
- Paco pants: Fabric Options
- Paco pants: Required Measurements
- Paco pants: Sewing Instructions
- Paco pants: What You Need
Simon shirt
- Simon shirt: Cutting Instructions
Simon shirt: Design Options
- Across back factor
- Armhole depth
- Armhole depth factor
- Back dart shaping
- Back darts
- Back neck cutout
- Biceps ease
- Box pleat
- Box pleat fold
- Box pleat width
- Button free length
- Button placket style
- Button placket width
- Buttonhole placket fold width
- Buttonhole placket style
- Buttonhole placket width
- Chest ease
- Collar angle
- Collar bend
- Collar ease
- Collar flare
- Collar gap
- Collar roll
- Collar stand bend
- Collar stand curve
- Collar stand width
- Collar width
- Cuff button rows
- Cuff drape
- Cuff ease
- Cuff length
- Cuff narrow button
- Cuff style
- Draft for high bust
- Extra top button
- Flat-felled seam allowace
- Front armhole extra cutout
- Hem curve
- Hem style
- Hips ease
- Legacy armhole depth
- Length bonus
- Number of buttons
- Round back
- Separate button placket
- Separate buttonhole placket
- Seperate button placket
- Seperate buttonhole placket
- Shoulder ease
- Shoulder seam shift: armhole side
- Shoulder seam shift: collar side
- Shoulder slope reduction
- Sleeve length bonus
- Sleeve placket length
- Sleeve placket width
- Sleeve width guarantee
- Sleevecap Q1 downward spread
- Sleevecap Q1 offset
- Sleevecap Q1 upward spread
- Sleevecap Q2 downward spread
- Sleevecap Q2 offset
- Sleevecap Q2 upward spread
- Sleevecap Q3 downward spread
- Sleevecap Q3 offset
- Sleevecap Q3 upward spread
- Sleevecap Q4 downward spread
- Sleevecap Q4 offset
- Sleevecap Q4 upward spread
- Sleevecap back X
- Sleevecap back Y
- Sleevecap ease
- Sleevecap front X
- Sleevecap front Y
- Sleevecap top X
- Sleevecap top Y
- Split yoke
- Waist ease
- Yoke height
- Simon shirt: Designer Notes
- Simon shirt: Fabric Options
- Simon shirt: Required Measurements
- Simon shirt: Sewing Instructions
- Simon shirt: What You Need
Simone shirt
- Simone shirt: Cutting Instructions
Simone shirt: Design Options
- Across back factor
- Armhole depth
- Armhole depth factor
- Back dart shaping
- Back darts
- Back neck cutout
- Biceps ease
- Box pleat
- Box pleat fold
- Box pleat width
- Bust dart angle
- Bust dart length
- Bust-aligned buttons
- Button free length
- Button placket style
- Button placket width
- Buttonhole placket fold width
- Buttonhole placket style
- Buttonhole placket width
- Chest ease
- Collar angle
- Collar bend
- Collar ease
- Collar flare
- Collar gap
- Collar roll
- Collar stand bend
- Collar stand curve
- Collar stand width
- Collar width
- Contour
- Cuff button rows
- Cuff drape
- Cuff ease
- Cuff length
- Cuff narrow button
- Cuff style
- Draft for high bust
- Extra top button
- Flat-felled seam allowace
- Front armhole extra cutout
- Front dart length
- Front darts
- Hem curve
- Hem style
- Hips ease
- Legacy armhole depth
- Length bonus
- Number of buttons
- Round back
- Separate button placket
- Separate buttonhole placket
- Seperate button placket
- Seperate buttonhole placket
- Shoulder ease
- Shoulder seam shift: armhole side
- Shoulder seam shift: collar side
- Shoulder slope reduction
- Sleeve length bonus
- Sleeve placket length
- Sleeve placket width
- Sleeve width guarantee
- Sleevecap Q1 downward spread
- Sleevecap Q1 offset
- Sleevecap Q1 upward spread
- Sleevecap Q2 downward spread
- Sleevecap Q2 offset
- Sleevecap Q2 upward spread
- Sleevecap Q3 downward spread
- Sleevecap Q3 offset
- Sleevecap Q3 upward spread
- Sleevecap Q4 downward spread
- Sleevecap Q4 offset
- Sleevecap Q4 upward spread
- Sleevecap back X
- Sleevecap back Y
- Sleevecap ease
- Sleevecap front X
- Sleevecap front Y
- Sleevecap top X
- Sleevecap top Y
- Split yoke
- Waist ease
- Yoke height
- Simone shirt: Designer Notes
- Simone shirt: Fabric Options
- Simone shirt: Required Measurements
- Simone shirt: Sewing Instructions
- Simone shirt: What You Need
Sven sweatshirt
- Sven sweatshirt: Cutting Instructions
Sven sweatshirt: Design Options
- Across back factor
- Armhole depth
- Armhole depth factor
- Back neck cutout
- Biceps ease
- Chest ease
- Collar ease
- Cuff ease
- Draft for high bust
- Front armhole extra cutout
- Hips ease
- Legacy armhole depth
- Length bonus
- Ribbing
- Ribbing height
- Ribbing stretch
- Shoulder ease
- Shoulder seam shift: armhole side
- Shoulder seam shift: collar side
- Shoulder slope reduction
- Sleeve length bonus
- Sleeve width guarantee
- Sleevecap Q1 downward spread
- Sleevecap Q1 offset
- Sleevecap Q1 upward spread
- Sleevecap Q2 downward spread
- Sleevecap Q2 offset
- Sleevecap Q2 upward spread
- Sleevecap Q3 downward spread
- Sleevecap Q3 offset
- Sleevecap Q3 upward spread
- Sleevecap Q4 downward spread
- Sleevecap Q4 offset
- Sleevecap Q4 upward spread
- Sleevecap back X
- Sleevecap back Y
- Sleevecap ease
- Sleevecap front X
- Sleevecap front Y
- Sleevecap top X
- Sleevecap top Y
- Sven sweatshirt: Designer Notes
- Sven sweatshirt: Fabric Options
- Sven sweatshirt: Required Measurements
- Sven sweatshirt: Sewing Instructions
- Sven sweatshirt: What You Need
Teagan T-shirt
- Teagan T-shirt: Cutting Instructions
Teagan T-shirt: Design Options
- Across back factor
- Armhole depth
- Armhole depth factor
- Back neck cutout
- Chest ease
- Draft for high bust
- Fit the waist
- Front armhole extra cutout
- Hips ease
- Legacy armhole depth
- Length bonus
- Neckline curvature
- Neckline depth
- Neckline width
- Shoulder slope reduction
- Sleeve ease
- Sleeve length
- Sleeve width guarantee
- Sleevecap Q1 downward spread
- Sleevecap Q1 offset
- Sleevecap Q1 upward spread
- Sleevecap Q2 downward spread
- Sleevecap Q2 offset
- Sleevecap Q2 upward spread
- Sleevecap Q3 downward spread
- Sleevecap Q3 offset
- Sleevecap Q3 upward spread
- Sleevecap Q4 downward spread
- Sleevecap Q4 offset
- Sleevecap Q4 upward spread
- Sleevecap back X
- Sleevecap back Y
- Sleevecap ease
- Sleevecap front X
- Sleevecap front Y
- Sleevecap top X
- Sleevecap top Y
- Waist ease
- Teagan T-shirt: Designer Notes
- Teagan T-shirt: Fabric Options
- Teagan T-shirt: Required Measurements
- Teagan T-shirt: Sewing Instructions
- Teagan T-shirt: What You Need
Tristan top
- Tristan Top: Cutting Instructions
Tristan top: Design Options
- Armhole depth
- Bust span ease
- Chest ease
- Depth of the cut in the back
- Depth of the cut in the front
- Front shoulder width
- Full chest ease reduction
- Hem Size
- Hem option
- High bust width
- Lacing location
- Lacing option
- Lacing width
- Peplum Size
- Peplum fullness
- Peplum option
- Roundness of the cut in the back
- Roundness of the cut in the front
- Shoulder Dart Curvature
- Shoulder Dart Position
- Shoulder to Shoulder Ease
- Strap width
- Upper Dart Length
- Waist dart length
- Waist dart position
- Waist ease
- Zipper location
- Tristan top: Designer Notes
- Tristan top: Fabric Options
- Tristan top: Required Measurements
- Tristan top: Sewing Instructions
- Tristan top: What You Need
Umbra undies
- Umbra undies: Cutting Instructions
Umbra undies: Design Options
- Back exposure
- Back waist dip
- Back waist dip shape
- Bulge
- Bulge fullness
- Elastic stretch
- Flip back part
- Front exposure
- Front reduction
- Front waist dip
- Front waist dip shape
- Gusset position
- Gusset width
- Horizontal fabric stretch
- Leg rise
- Minimum fabric width
- Pocket gap
- Pocket height
- Pockets
- Rise
- Split position
- Vertical fabric stretch
- Umbra undies: Designer Notes
- Umbra undies: Fabric Options
- Umbra undies: Required Measurements
- Umbra undies: Sewing Instructions
- Umbra undies: What You Need
Wahid waistcoat
- Wahid waistcoat: Cutting Instructions
Wahid waistcoat: Design Options
- Armhole depth
- Armhole depth factor
- Back inset
- Back scye dart
- Center back dart
- Chest ease
- Draft for high bust
- Front inset
- Front scye dart
- Hem radius
- Hem style
- Hips ease
- Legacy armhole depth
- Length bonus
- Neck inset
- Neck opening style
- Neckline drop
- Number of buttons
- Pocket angle
- Pocket location
- Pocket width
- Shoulder inset
- Waist ease
- Welt height
- Wahid waistcoat: Designer Notes
- Wahid waistcoat: Fabric Options
- Wahid waistcoat: Required Measurements
- Wahid waistcoat: Sewing Instructions
- Wahid waistcoat: What You Need
Waralee wrap pants
- Waralee wrap pants: Cutting Instructions
Waralee wrap pants: Design Options
- Back Crotch Factor Horizontal
- Back Crotch Factor Vertical
- Back Raise
- Back pocket
- Crotch Back
- Crotch Front
- Fit waist
- Front Crotch Factor Horizontal
- Front Crotch Factor Vertical
- Front pocket
- Front pocket style
- Hem size
- Knot in Front
- Knot position
- Leg Shortening
- Leg Size
- Separate waist band
- Show mini
- Waist Band
- Waist Overlap
- Waist Raise
- Waralee wrap pants: Designer Notes
- Waralee wrap pants: Fabric Options
- Waralee wrap pants: Required Measurements
- Waralee wrap pants: Sewing Instructions
- Waralee wrap pants: What You Need
Yuri hoodie
- Yuri hoodie: Cutting Instructions
Yuri hoodie: Design Options
- Across back factor
- Armhole depth
- Armhole depth factor
- Back neck cutout
- Biceps ease
- Chest ease
- Collar ease
- Cuff ease
- Draft for high bust
- Front armhole extra cutout
- Hips ease
- Legacy armhole depth
- Length bonus
- Shoulder ease
- Shoulder seam shift: armhole side
- Shoulder seam shift: collar side
- Shoulder slope reduction
- Sleeve length bonus
- Sleeve width guarantee
- Sleevecap Q1 downward spread
- Sleevecap Q1 offset
- Sleevecap Q1 upward spread
- Sleevecap Q2 downward spread
- Sleevecap Q2 offset
- Sleevecap Q2 upward spread
- Sleevecap Q3 downward spread
- Sleevecap Q3 offset
- Sleevecap Q3 upward spread
- Sleevecap Q4 downward spread
- Sleevecap Q4 offset
- Sleevecap Q4 upward spread
- Sleevecap back X
- Sleevecap back Y
- Sleevecap ease
- Sleevecap front X
- Sleevecap front Y
- Sleevecap top X
- Sleevecap top Y
- Yuri hoodie: Designer Notes
- Yuri hoodie: Fabric Options
- Yuri hoodie: Required Measurements
- Yuri hoodie: Sewing Instructions
- Yuri hoodie: What You Need
Measurements we use
- Ankle circumference
- Biceps circumference
- Bust front
- Bust point to underbust
- Bust span
- Chest circumference
- Cross seam
- Cross seam front
- Crotch depth
- HPS to bust
- HPS to waist back
- HPS to waist front
- Head circumference
- Heel circumference
- High bust
- High bust front
- Hips circumference
- Inseam
- Knee circumference
- Neck circumference
- Seat back
- Seat circumference
- Shoulder slope
- Shoulder to elbow
- Shoulder to shoulder
- Shoulder to wrist
- Underbust
- Upper leg circumference
- Waist back
- Waist circumference
- Waist to armpit
- Waist to floor
- Waist to hips
- Waist to knee
- Waist to seat
- Waist to underbust
- Waist to upper leg
- Wrist circumference
- Documentation
- FreeSewing Designs
- Aaron A-Shirt
- Aaron A-Shirt: Sewing Instructions
Aaron A-Shirt: Sewing Instructions
Table of contents
- Step 1: Close seams
- Step 2: Finish hem
- Step 3: Sew knit binding to the front
- Pick your spot
- Place (the start of) your binding
- Make sure you know where to sew
- Sew binding in place
- Mark binding ends
- Sew binding ends together
- Finish last 6cm of binding
- Step 4: Fold knit binding to the back and sew down
- Fold your binding over the fabric edge to the back
- Sew your binding down
- Step 5: Trim back knit binding on the inside
Step 1: Close seams
Put front and back on top of each other with . Sew the side seams and the short seams at the shoulder straps. If you have a serger, this is a good moment to use it. If not, finish your seams otherwise.
Step 2: Finish hem
Fold the hem upwards, and sew it down. If you have a coverlock, use it. If not, use a or to keep the seam stretchable.
Fold only once, to avoid bulk
Knitwear doesn’t ravel, so you can simply fold this over once and sew it down, then neatly trim back the fabric.
Step 3: Sew knit binding to the front
About knit binding
If you are new to knit binding, you might read this page on the subject.
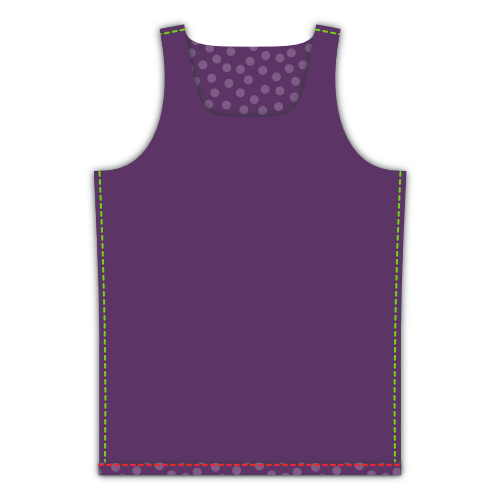
Repeat steps 3 and 4 for both armholes and the neck opening
The procedure outlined below applies to both of the armholes as well as the neck opening. In other words, you’ll have to do this three times.
Start with the simplest opening
I would advise you to start with whatever opening has the most uniform curvature. By default, those are the arm holes, but if you changed the pattern options (think racerback) that might not be the case.
Either way, the less sharp bends you have, the easier it will be. So start with that to warm up before you do the trickier bends.
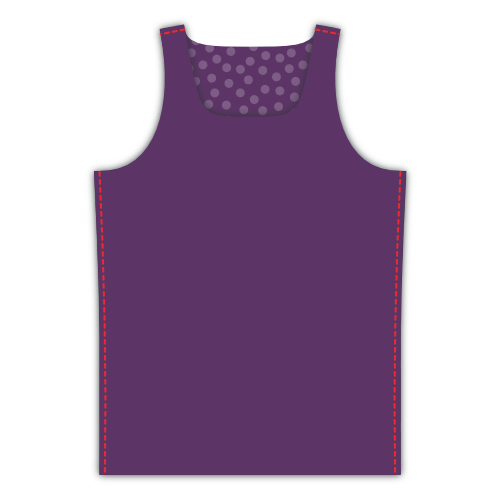
We are going to finish the arm and neck hole with knit binding (note: not a knit band. There’s a difference, and it’s explained here).
This is the only part of making this A-shirt that requires a bit of practice. Don’t worry, all you need to do is make a couple of these and you’ll be a pro in no time.
Pick your spot
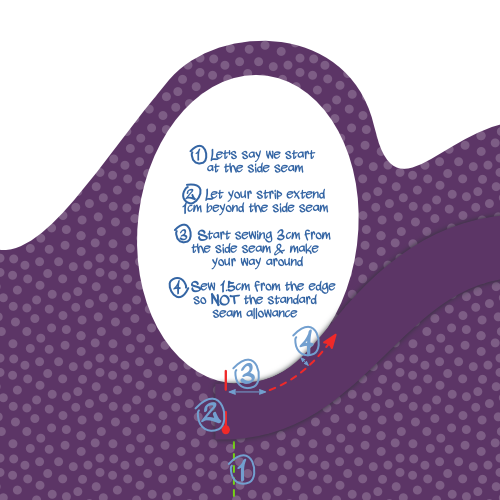
The first thing we need to do is decide where we are going to start/stop our binding. Here’s what I suggest:
- For the armholes: at the side seam. This will hide our seam under the arm
- For the neck opening: the center back of the neck. You might want to mark this with a pin
Place (the start of) your binding
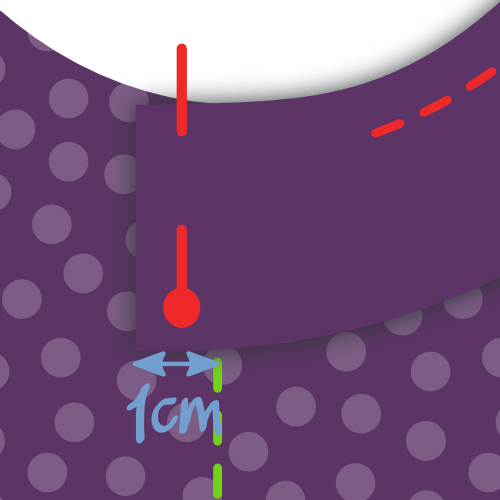
Put your A-shirt down with the good side up, and place your binding strip on top of it with the good side down (as in, good sides together).
Align the long edge of your strip with the edge of your fabric so the strip lies on top of the fabric (not in the opening). Place the corner on your starting point.
Now shift your binding strip 1cm beyond your starting point. This little extra will guarantee we can join the two ends later.
Make sure you know where to sew
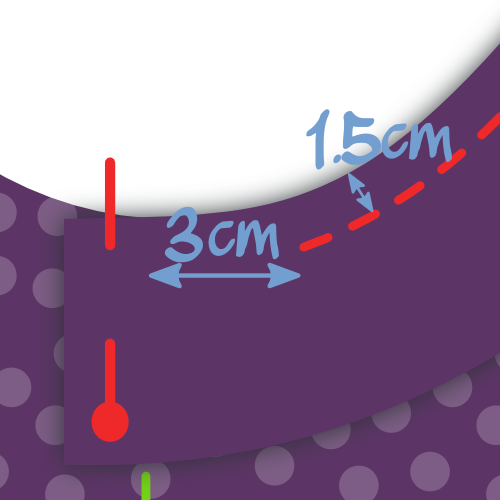
We are going to sew 1.5cm from the edge. So be careful because this is not the standard seam allowance.
The easy way to keep this 1.5cm distance is by using a seam gauge. Or do what I do, place a piece of marking tape on your sewing machine and mark a line on it 1.5cm from your needle. Then all you need to do is keep the edge of your fabric aligned with that line.
Also, we are not starting at our start point, but we skip the first 3cm. We’ll need this wiggle room later to join the ends of our binding.
Sew binding in place
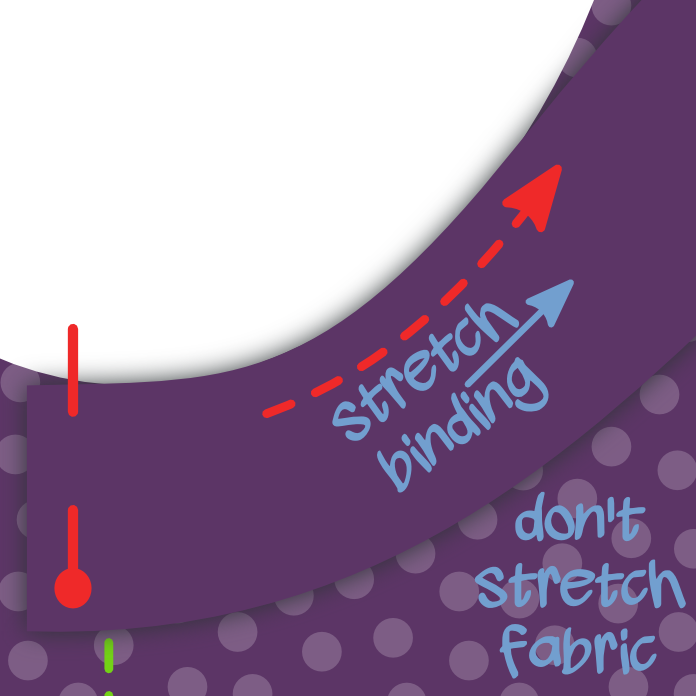
Sew your binding in place while gently stretching the binding, but not the fabric. Make sure not to sew the last 3cm but leave them, just as you did at the start.
You might need to practice a bit to get the hang of it.
Make sure to stretch your binding more when you’re taking a sharper bend. Read my notes on knit binding for more info.
Mark binding ends
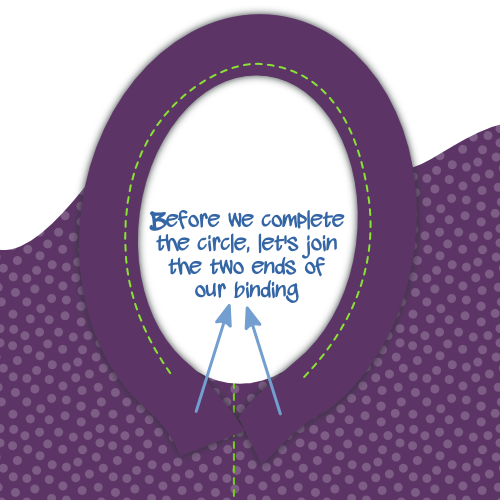
With about 6cm left to go before we complete our circle, it’s time to sew the ends of the binding together.
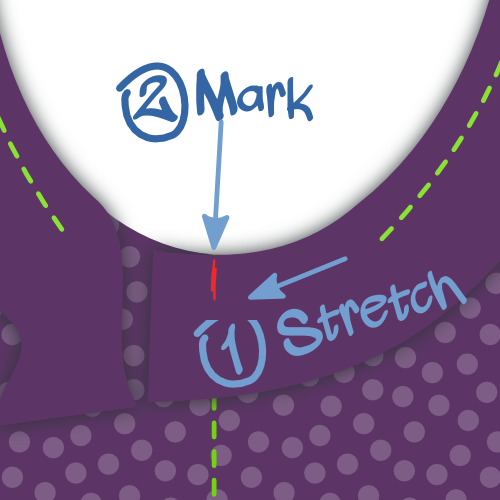
Take one of the edges, and stretch it along the 3cm separating it from the start point as you would while sewing.
Mark the binding where it reaches the start point. Do the same for the other end.
Sew binding ends together
Fold your A-shirt in whatever way makes it easier for you to place both binding ends with good sides together, aligning the marks. Sew them together on the mark.
6 cm is not much, but should be enough to get both edges comfortably under your sewing machine to sew them together.
Finish last 6cm of binding
Now that your binding ends are joined together, it’s time to finish the last 6cm of binding. Sew it down, staying 1.5cm from the edge as you did before.
Step 4: Fold knit binding to the back and sew down
Fold your binding over the fabric edge to the back
Fold your binding fabric around the fabric of your A-shirt to the back. This is how we’ll sew it down.
While the fabric is folded double at the front (hiding the fabric edge in the process) there’s no need for that at the back. We will merely trim back the edge later, given that knit doesn’t ravel. If we were to fold back the fabric at the back too, it would only add bulk.
Sew your binding down
From the right side of your fabric, sew along the inner edge of your binding (furthest from the edge), making sure to catch the binding at the back in the process.
If you have a coverlock machine, that would be perfect for this seam
You’ll have to, once again, stretch your binding a bit while doing this. But this time, there’s an extra caveat to look out for.
Beware of the uneven feed
As you feed your binding through your sewing machine, the feed dogs will pull the bottom layer (back of your binding) forward.
In a perfect world, all layers will follow smoothly. But more often than not, the top layer (front of your binding) tends to lag behind a bit. This causes your binding to not neatly fold around the edge of the fabric, but make ugly wrinkles.
So watch out for this, and if you see it happening, stretch the under-layer a bit extra to compensate.
Step 5: Trim back knit binding on the inside
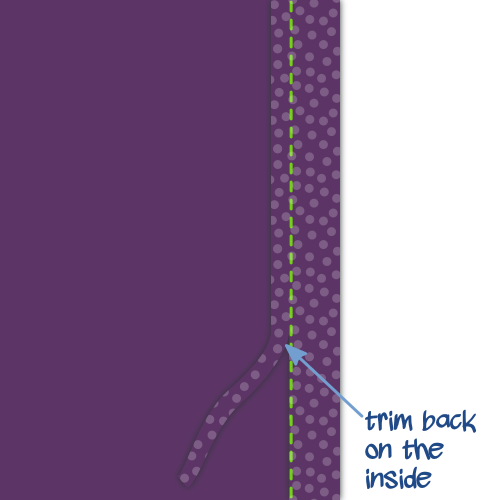
On the inside of your A-shirt, trim back the knit binding against your seam to finish up.
Be careful not to cut a hole in your A-shirt. Seriously, this happened to me on more than one occasion.

Contents by
- Authors:
- Maintainers:
- Last updated: 14 days, 14 hours ago
Table of contents
- Step 1: Close seams
- Step 2: Finish hem
- Step 3: Sew knit binding to the front
- Pick your spot
- Place (the start of) your binding
- Make sure you know where to sew
- Sew binding in place
- Mark binding ends
- Sew binding ends together
- Finish last 6cm of binding
- Step 4: Fold knit binding to the back and sew down
- Fold your binding over the fabric edge to the back
- Sew your binding down
- Step 5: Trim back knit binding on the inside